Microcomputer lower dead point detecting device
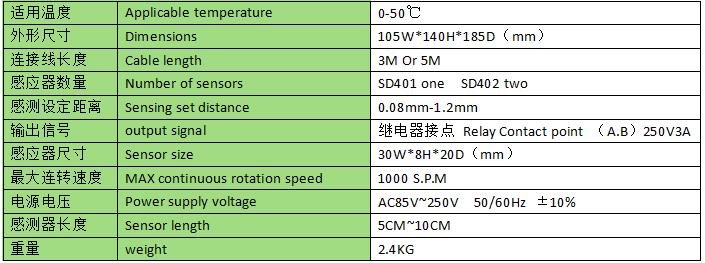
SD-401 a host, an output device (single point)
SD-402 a host, two output devices (two points)
Features of the machine;
* Sensor operation settings: the upper iron and the sensor head to adjust the 0.8mm to 1.2mm, press the set switch after 199 to 0, and then move the sensor can be adjusted to 80 to 120 operating distance (That is, 0.8mm to 1.2mm); set to complete the need to press the set button to restore.
* Monitor value setting operation: Precision setting range ± 1um ~ ± 99 um, monitoring value according to your actual needs and set the accuracy.
* When the die starts to run this test the first four times show the number for the mold height test average. (This value is recalculated when the punch power switch is cut to "OFF" or the sensing line leaves the sensor and reinserts the sensor.
* Sp: speed anomalies and downtime will occur: Another reason: stamping, the upper and lower mirror will appear when the sudden fall off.
* OP: appears when the sensing line and the sensing head are broken or the sensing line is opened.
* HI: too high abnormally red and high yellow lights will light. (More than 1.2mm distance)
* LO: too low abnormally red and low red light will light. (Distance below 0.8mm)
* ES: for the wrong to send inspection, material without material inspection, squeeze material inspection and other abnormalities will appear.
* When the tolerance value display exceeds the set value, the abnormality lamp will be on.
* The machine has a self-check function.
* This machine specification setting value is 1um unit, which can be selected according to the precision of mold.
* This test can be installed to send mislead inspection, material without material inspection (electric eye detection), squeeze material inspection (sensing bar detection).


